June 17th – So help me god, I’ve been asked how you know if your bottom bracket needs replacing (see last entry, 16th June) – so I made a quick video. The old part is held in a vice over white paper for clarity. I’m wobbling the other end, out of shot. There should be no wobble at all.

Hope that helps!

January 21st – another one for Bob’s big book of bicycle breakdowns. These are a pair of Shimano SPD XTR clipless pedals – the mechanism on them engages with a metal piece on the bottom of special shoes that means I ‘click in’ to them and can pull the pedals up as well as push down. 

These are considered a fairly high-end pedal, and have a platform – the black grooved frame – around them for additional foot support. They cost about £70 a pair, I guess and are generally good quality. This pair had done about 10,000 miles.

They are built around a cylindrical bearing held together internally by two nuts – an adjuster and a locknut, and this keeps everything adjusted and spinning without play.

Except when the threaded part snaps from fatigue, the bearing falls apart and the pedal tries to come off the spindle. The one on the right is normal, the one on the left, fatally broken.

Thankfully, it wasn’t far from home and was still ridable with care. That’s an unwanted expense in January…

August 19th – I’m fussy about brakes. Very fussy indeed. Urban cycling – particularly in heavy traffic – demands the ability to control speed and stop with certainty and dependability in all conditions.

Since I discovered disc brakes a few years ago now, I’d never have a bike fitted with anything else. After using cable controlled versions – the excellent Avid BB7 – these days, I use hydraulic brakes by Avid (part of what used to be Sachs for old timers reading out there) and by Shimano.

They are both excellent kit. Being hydraulic, however, they absolutely devour pads.

Modern cycle disc brakes started on mountain bikes, where braking is usually short, or at relatively low speed. With similar units on commuting and road bikes, engineering questions of heat dissipation, wear and glaze on the pads are critical.

Discs and callipers get fearsomely hot very quickly. It’s not unusual to see my discs steaming on wet rides. Prolonged use can cause the surface of the brake pad to become shiny and lose grip, ‘glazing over’, and the wear is constant. 

There are two general types of brake pad; sintered metal and resin (AKA ‘organic’) – sintered last a long time, are great in the wet but can howl in use and wear discs heavily. Resin pads wear quickly, are silent, and generally offer softer control and better ‘modulation’.

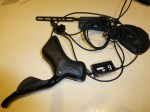
I’ve been very, very pleased with the Shimano brakes, which have been on the bike for about 4-5 months now, but the resin pads they came with haven’t impressed me. The pads for these units come on a heatsinking vaned plate, and are very easy to change, which is a blessing as the rear set were never the same after I cleaned the bike using normal bike cleaner. The front ones glazed out a few days ago.

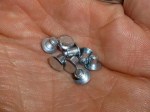
I went to sintered on the back when they became poor, and was shocked at the huge difference made, and the fact that so far they’ve been silent, so today, I popped some in the front, too. (The new sintered pad is on the left; the knackered resin on the right).

Braking harmony restored.

I must say, recent experience is leading me away from resin or organic pads.

April 24th – It’s not often I cover matters of religious division here on 365daysofbiking, but there’s a time and place for everything. I’ve mentioned before that I prefer a gearhub to derailleur gears; low maintenance, reliable, bombproof. Gearhubs, hub gears or IGHs are a divisive thing – I use an Alfine by Shimano; it offers 11 gears at a 404% range, and works like a charm. The disadvantage is it concentrates a lot of weight at the rear of the bike, and life can get really challenging if they fail.

People get very energised about hub gears, and about the oil one should lubricate them with. Allow me to explain…

Last week I had trouble with my gears not engaging correctly. Often with Alfine units – which run in an oil bath – the slipping indicates that the oil in the hub needs a change, and this one hadn’t been done for about 3,000 miles. As it happened, I was wrong; the adjuster mechanism had slipped slightly when I’d last fitted the wheel and resetting it’s position solved the problem, but not before I’d drained the oil and changed it a couple of times for thin stuff.

The standard oil Shimano recommend is thick. The procedure is to remove a small plug on the hub, screw in a length of pipe which attaches to a syringe, and ‘suck out’ the old oil. I generally leave it overnight to drain. I then clean the syringe with alcohol, suck up 25ml of clean oil, and squirt that into the hub. Because this one hadn’t been done for ages, I used a thin oil, and then reinserted the plug, a rode the bike for a while. I then drained the thin oil the same way. I repeated the process until the oil coming backout was reasonably clean.

Rather than use Shimano oil, which is expensive and goes thick in winter, I decided to use oil by another hub-gear manufacturer; Rohlhoff. Rohlhoff hubs contain more plastic parts than Shimano, so their oil should be OK. It’s thinner, but seems like good stuff.

The Rohlhoff oil also comes with a ‘cleaning oil’, so tonight’s job was to drain the hub once more, and pump in 25ml of cleaning oil. I will ride the bike tomorrow, and then drain it again, before finally pumping in the new oil.

Sounds like a parlarver, but it’s easy, really. I love the hub gears, and sometimes, you have to demonstrate you care.

Say it with oil. 

I bet this has made the purists tut their disapproval…

February 20th – Talking about making a bike your own, bike fettling experiments continue, and the maintenance jobs stack up. First off is replacement studs for the winter tyres. The metal inserts do come out, particularly if you skid, they tend to tear from their sockets. One thing the manufacturers – Schwalbe – pride themselves on, is that if you give them a call (They’re only in Telford), they’ll send you a large bag full of the carbide  rivet-like spikes in the post by return. With the air out of the tyre and warm water, it’s easy to pop in the replacements with pliers. I try to do this towards the end of the season every year.

On the higher tech side, I’m experimenting with some swanky mechanised gearing kit, but it’s been a bit of a challenge to get working, as the components all need updating to get them functioning together. Having got everything talking to everything else now, the mechanical experimentation can begin.

Fun times.