November 25th – Another good one for Bob’s big book of bizarre mechanical failures. A few weeks ago I bought new cycling shoes and fitted new SPD cleats – the small pieces of metal that lock into the pedals for better engagement in place of toe clips – as is normal. I nipped up the screws, and gradually adjusted them for best cleat position.

Riding to work this morning, it felt like my left side cleat was clogged with mud or debris, and I had difficulty engaging and disengaging. As I went on it became more and more tricky. Arriving, I inspected the leat and found it had come loose and was rattling freely.

I have never had this happen before and am very surprised.Potentially very dangerous, I’m glad I found it trying to clip in and not out.

If you use lipless pedals, check your cleats for tightness today.

November 17th – This new Hope R2i light I’m testing is rather good. This is on a middle setting on the canal in total darkness near Aldridge (obviously, no camera flash was used). Battery life seems good, and the optics give a decent beam. I’d say this is better than the R4 I was using last season, but actually has two less led elements.

A real discovery. It’s no lightweight, but it’s a very good light.

November 12th – I’ve been lucky enough to get my hands on a Hope R2i light to test, and I’m very impressed with it.

I’ve been looking for an integrated, one-piece rechargeable front light for a while, as I’m fed up with using external batteries. I have been using a Lezyne thing, but it’s just not up to the job on long commutes.

My favourite light maker, Hope of Barnoldswick have produced an integrated version of their R2. It’s no lightweight, but the body is machined aluminium, and it’s well sealed from the elements. The twin LED elements are bright enough to ride unlit lanes fast, even on the lowest of the five constant settings.

The mount is the same as the hope R4, and is a solid, sturdy bayonet action with all parts made in metal.

Fitted with a handy barograph charge indicator, if this lasts a working week on a charge (and Hope claim 30 hours on low power) I’ll be a happy bunny and buy one.

A nice product with a solid look and feel – but man, it feels heavy next to the Lezyne unit it’s replaced.

November 11th – As bike gear gets cheaper and the drive to reduce weight continues, lots of stuff is getting crappier. I’ve always liked Sigma bike computers – cheap and well engineered. However, the last one has a particularly loose twist-lock mount. Today, it spun from the holder on the bars in traffic, and before I had chance to recover it, it went under the wheel of a car. This is the result.

From lights to GPS units to bike computers, bike mounts are getting crappier. Can we stop weight shaving and cost cutting please?

October 23rd – Here’s a security tip for cyclists with disc brakes. The other day I noted that you can’t make your bike theft proof, but you can make it fiddly and a pain to steal, hopefully putting off all but the most determined thieves. 

Some of the best deterrents lie in novelty; professionals will come with tools usually to smash D locks or cut cables, not both. You can make your D lock more effective by ‘filling’ it with as much bike as possible (thieves often use bottle jacks to break them open – they can’t if there isn’t room for one).

This yellow item probably isn’t that secure, but it’s effectiveness lies in the way it works: they’re sold online as disc brake locks for motorbikes and they have a plunger that latches through your brake disc, rendering the wheel unable to turn. In addition, there’s a piercing, vibration-activated alarm inside – so if the bike is handled roughly, it screams the place down.

It’s small, compact, thieves probably wont want to bother with it coupled with other locks, and it costs less than a tenner. What’s not to love?

September 26th – Interested and fascinated to note that the restored windmill at Longdon that I photographed a week ago actually has a sailed that rotates with the wind as required – note the sails are on a different side of the building this week.

That mill has to be a tour de force of mechanical geekery… I love it.

June 17th – So help me god, I’ve been asked how you know if your bottom bracket needs replacing (see last entry, 16th June) – so I made a quick video. The old part is held in a vice over white paper for clarity. I’m wobbling the other end, out of shot. There should be no wobble at all.

Hope that helps!

June 16th – Bottom brackets are a pain in the arse. I can’t believe that after more than a century of cycling technological innovation, they’re still so rubbish.

The bottom bracket is the spindle that the cranks mount on through the bottom of the frame, which spins freely allowing your pedals to rotate. As a mechanical component, the bottom bracket experiences the worst abuse – epicentric, unbalanced point loading, muck, water and corrosion. My bottom brackets take my full weight, plus that of the bike and load. They work hard.

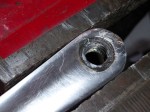
Several solutions exist for bottom brackets – the component axle and loose bearings – the old way and fiddly to adjust and maintain; the ‘sealed cartridge’ (above) – a disposable insert designed for easy changing; the external – a frankly daft idea that’s gained traction in the last five years; the thoroughly insane press fit, preferred by the weekend Wigginses with plastic bikes.

All are rubbish, really.

On Sunday, I noticed the cranks on my bike had alarming play within the frame. The non-drive side bearing had collapsed in the cartridge. It’s done about 20,000 miles. Removing it is easy if you have the right tools and the person who fitted the last one did it properly. 

Cranks are removed with a special extractor, and the cartridge is removed with a special socket tool from the DRIVE SIDE. It is a left hand thread, meaning the unit is turned clockwise to unscrew it. That fact escapes many, and has led to loads of skinned knuckles and damaged frames.

The cartridge is left hand threaded to prevent it loosening in use due to precession.

There is a support bush on the other side that unscrews normally using the same tool. The threads are cleaned with a small wire brush and degreaser, dried, greased with anti-seize paste and the new one fitted. Half an hour tops.

If the threads are not greased, the unit will be very, very hard to remove in future.

A replacement is about £15-£20. I’ve tried expensive alternatives – they make no difference.

See you again in another 15-20,000 miles.

May 30th – I have a new camera to try out. I usually use a Panasonic TZ70, but having used that brand for 8 years, I often try alternatives to see how they are when I get chance.

Courtesy of a generous friend, I’m currently using a Nikon S9900… and I rather like it. With similar ultra zoom performance, it seems a bit more solidly build, and I have to say, in most situations I’ve used it in, the camera has produced excellent images.

They seem a little vivid, but the macro mode is excellent, and much better than I’m used to, as I found when I tried it on various flowers.

I have this for a couple of weeks, so plenty of time to find the issues, I guess.

April 25th – A recovery day, mainly resting and pottering around attending to mechanical issues with the bikes. Long-term readers will remember my bizarre crank failure last spring, and at the time I suggested I’d never see it again: well, I was wrong. 

This is an identical Lasco crank from my other bike. There are clear cracks growing either side of the pedal mount bore. Thankfully, I had a spare so changed it over on discovery, hopefully forestalling an unexpected failure.

I‘m not sure if this is a poor design, manufacturing failure or a sign that I should lose some weight…